")

Rotisserie chicken tacos are the kind of weeknight dinner that saves the day without sacrificing flavor. Using a store-bought rotisserie chicken means dinner is on the table in 25 minutes or less. I reach for this recipe whenever the week gets busy and I still want something the whole family will love.
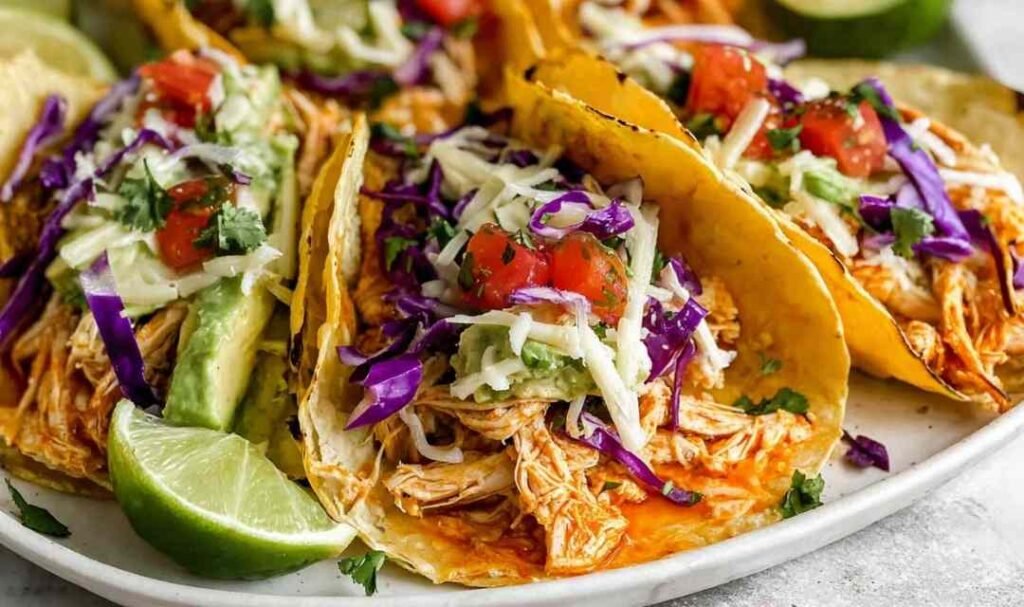
There is something magical about opening the fridge, spotting a leftover rotisserie chicken, and knowing exactly what is for dinner. These rotisserie chicken tacos have become a staple in my kitchen because they are fast, satisfying, and endlessly flexible. The seasoned chicken simmered in salsa fills the house with the most welcoming aroma. Tucked into warm corn tortillas and loaded with creamy avocado and crunchy cabbage, every bite feels fresh and bold.
Table of Contents
Ingredients for Rotisserie Chicken Tacos
I always keep a rotisserie chicken in my fridge on busy weeks, and this recipe is exactly why. The ingredient list is short and simple, but each one earns its place. My go-to brand for salsa is any restaurant-style variety with good chunky texture since it gives the chicken filling real depth.
For the Chicken:
- 1/2 cup restaurant-style salsa (I recommend a chunky variety for the best texture)
- 1/2 cup low-sodium chicken broth
- 2 tablespoons taco seasoning (store-bought works great, or use your homemade blend)
- 1 whole rotisserie chicken, shredded (about 3 to 4 cups of meat)
For the Tacos:
- 8 medium corn tortillas (flour tortillas also work well)
- 1 cup shredded red cabbage (green cabbage or shredded lettuce is a great swap)
- 1 cup shredded cheddar cheese (in my experience, freshly shredded melts far better than pre-shredded)
- 1 avocado, sliced
- Fresh cilantro, chopped (to taste)
- 1 lime, cut into wedges
Step-by-Step Instructions
I recommend reading through all the steps before you start so everything comes together smoothly. This recipe moves fast, and that is the whole point.
Step 1: Build the Base
In a large saucepan over medium heat, combine 1/2 cup of restaurant-style salsa, 1/2 cup of low-sodium chicken broth, and 2 tablespoons of taco seasoning. Stir everything together and bring the mixture to a gentle simmer. You should start to smell the spices bloom within a minute or two.
Step 2: Add the Chicken
Add your shredded rotisserie chicken to the saucepan and stir well to coat every piece in the seasoned salsa mixture. Let it simmer for 3 to 5 minutes, stirring occasionally, until the chicken is heated through and has soaked up all those bold flavors. Pro tip: if the mixture looks too thick, add a splash more broth to loosen it up.
Step 3: Warm the Tortillas
While the chicken simmers, warm your corn tortillas. You can do this directly over a gas burner for about 20 seconds per side for a slight char, or wrap them in a damp paper towel and microwave for 30 to 45 seconds. Warm tortillas are much more pliable and far less likely to crack when you fold them.
Step 4: Assemble and Serve
Spoon a generous portion of the seasoned chicken into each tortilla. Top with shredded red cabbage, cheddar cheese, sliced avocado, and fresh cilantro. Squeeze a lime wedge over each taco right before eating for a bright pop of freshness. Serve immediately and enjoy.
What to Serve with Rotisserie Chicken Tacos
The best sides for rotisserie chicken tacos balance the bold, savory filling with fresh flavors and satisfying textures.
Mexican Rice: A scoop of fluffy Mexican rice alongside your tacos makes the meal more filling and rounds out the plate beautifully. The mild tomato base pairs naturally with the taco seasoning in the chicken. Try it with this street corn chicken bowl for a fun Mexican-inspired spread.
Guacamole and Tortilla Chips: Creamy guacamole is a crowd-pleaser that also complements the avocado slices already in the tacos. Serve chips on the side for scooping and snacking between bites.
Chicken Avocado Ranch Burritos: If you are feeding a hungry crowd, set up a taco-night spread and add these chicken avocado ranch burritos to the table. They share similar fresh ingredients and make a satisfying addition.
Easy Chicken Salad: A light and refreshing easy chicken salad on the side adds a cool, creamy contrast to the warm, seasoned taco filling.
Pollo Asado: For a Mexican-inspired taco night, serve these alongside this smoky and flavorful pollo asado recipe for guests who want something grilled and extra bold.
Honey BBQ Chicken Rice Bowl: This honey BBQ chicken rice bowl makes a kid-friendly side option that uses similar pantry staples and keeps dinner simple.

Storage and Serving Tips
Store any leftover rotisserie chicken taco meat in an airtight container in the refrigerator for up to 3 days. The filling also freezes well for up to 3 months. Let it thaw overnight in the fridge before reheating.
I recommend reheating the chicken filling in a small saucepan over medium-low heat with a splash of broth to keep it moist. The microwave also works in a pinch. Always assemble tacos fresh with new toppings rather than storing assembled tacos.
Pro tip: the seasoned chicken filling is incredibly versatile. Use leftovers in burrito bowls, quesadillas, or tossed over rice for an easy second meal the next day.
Frequently Asked Questions
Can I use flour tortillas instead of corn?
Yes, flour tortillas work great in this recipe. They are softer and hold up well with heavier toppings like avocado and extra cheese.
What can I use instead of a rotisserie chicken?
Any leftover shredded chicken works here. You can also use this Mexican chicken marinade recipe to cook chicken from scratch with bold flavor.
How do I keep the taco filling from drying out?
Keep the heat on medium and stir frequently while the chicken simmers. If the filling thickens too much, add a tablespoon or two of chicken broth at a time until it reaches the right consistency.
Conclusion
These rotisserie chicken tacos prove that weeknight dinner does not have to be complicated to be delicious. With just a handful of simple ingredients and less than 30 minutes, you get a meal packed with bold, satisfying flavor. Give this recipe a try tonight and see how quickly it becomes a go-to in your home.

Rotisserie Chicken Tacos
Ingredients
Equipment
Method
- In a large saucepan over medium heat, combine the salsa, chicken broth, and taco seasoning. Stir and bring to a gentle simmer.
- Add the shredded rotisserie chicken and stir to coat. Simmer for 3 to 5 minutes until the chicken is heated through and has absorbed all the flavors.
- Warm the corn tortillas over a gas burner for 20 seconds per side, or microwave in a damp paper towel for 30 to 45 seconds.
- Spoon a portion of chicken into each tortilla. Top with shredded cabbage, cheddar cheese, avocado, and fresh cilantro. Squeeze lime over each taco and serve immediately.